MA70 7MGTE CPS Rebuild
Brent here of Concept Auto Ind Doing a walk/talk through of a CPS Digital Hall effect sensor upgrade with a bearing & oil seal replacement
The relationship with this client began from humble beginnings.
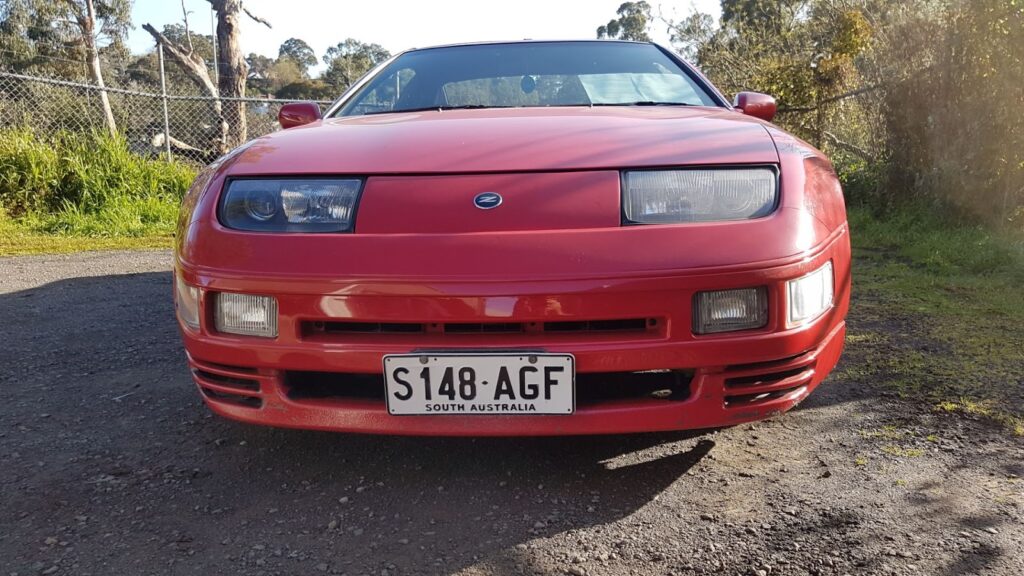
He recently purchased his dream vehicle – a reasonable condition Z32 from an interstate party and at a reasonable price and had begun accumulating his hot up parts list.
I had a set of Nolathane Poly Subframe Bushes for sale, an excess set from my stockpile, and he straight up super-lowballed me on price. We had a chat, we agreed on a price, then he started with the questions – General Qs & As of new Z32 ownership. I had to give him my “do you know what you have brought” speech.
I went out and delivered the bush set and whilst I was there I couldn’t help myself and started snooping. The car wasn’t idling 100% or running its best, I did my ABC123s of setup – TPS, CAS Timing & Idle adjustments. The car audibly became smoother & consistent BUT the final question was “should it be requiring constant coolant top ups?”…”NUP!”
We organised a time for a drop off and I began the teardown, we had inconsistent low compression, lower than I’d expect from the odometer reading. The previous owner was an alleged hobby racer that fancied themselves as an engine builder and this motor had evidence of being apart and was meant to be in “good” condition. The truth would be farther than we were expecting…
With the client intending on performance upgrades and the coolant leak not being external, an internal coolant loss meant cylinder heads were coming off at a minimum. A Simple MLS Head Gasket and ARP Head Stud Upgrade was the goal, maybe some turbos if needed.
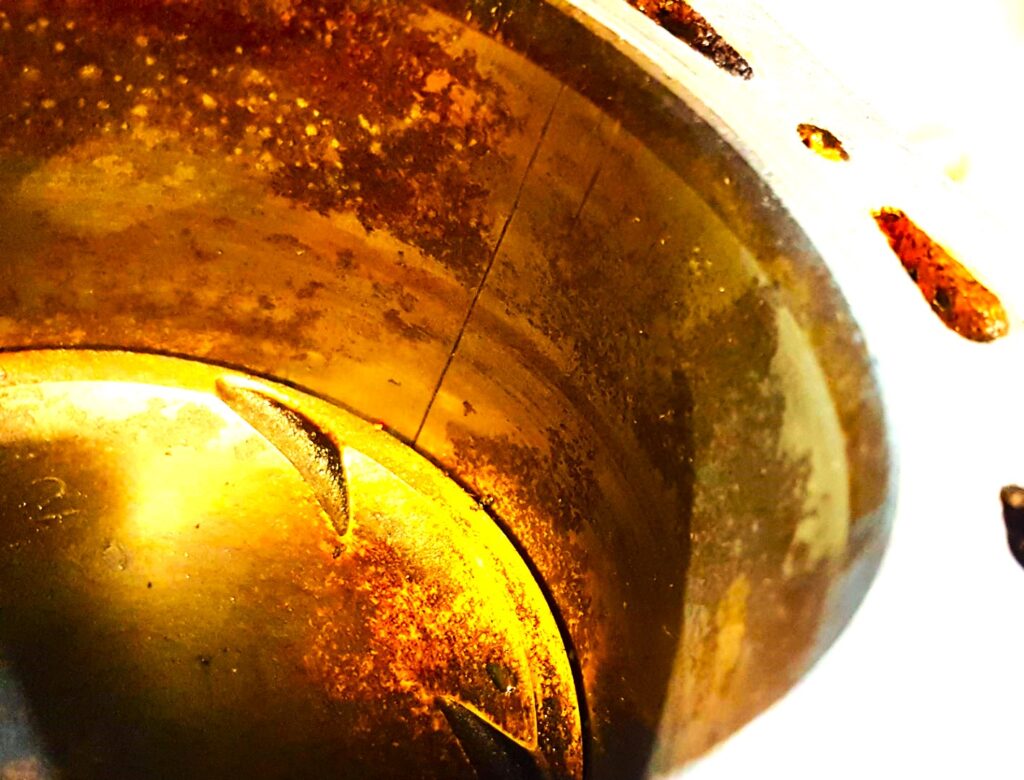
With heads off we found larger issues in the bottom end – the bores had uneven crosshatching – thinking power drill by hand, the rust scale wasn’t appealing either & several bores had vertical scouring but the biggest hurdle would be the piston to bore clearances were very large, dangerously large. The worser of the pistons had a loose wiggle and if the intent is pushing more boost into these chambers, I didn’t want a piston deciding to pitch off angle, grab a skirt & say “Ciao! VG!”
After some discussion & debate and confirming the client’s intent for more engine output, continued to pull the motor & auto transmission out and delivered it to the machinist – The Offspring sang it best, “man she’s got issues & im gonna pay!”
The engine shop confirmed the bores had issues, the OEM 87mm pistons would be a touch undersized once the bores were all cleaned up. If it were 1 or 2 bores, sleeving could have been an option, easiest solution would be oversized forged pistons but the client had a budget in mind (at this stage) and wanted a more cost effective solution so the factory pistons were plated up in size 3 thou to bring everything back into range.
Bores were cleaned up, pistons were a suitable size now, reassembly could begin. It’s always good practice to rotate the assembly after each pistons loaded – piston & rotate, piston & rotate, cylinder by cylinder until #5 went in & rotation action started to bind up so….enter problem #2 = Bent Crank & an All Stop was called..
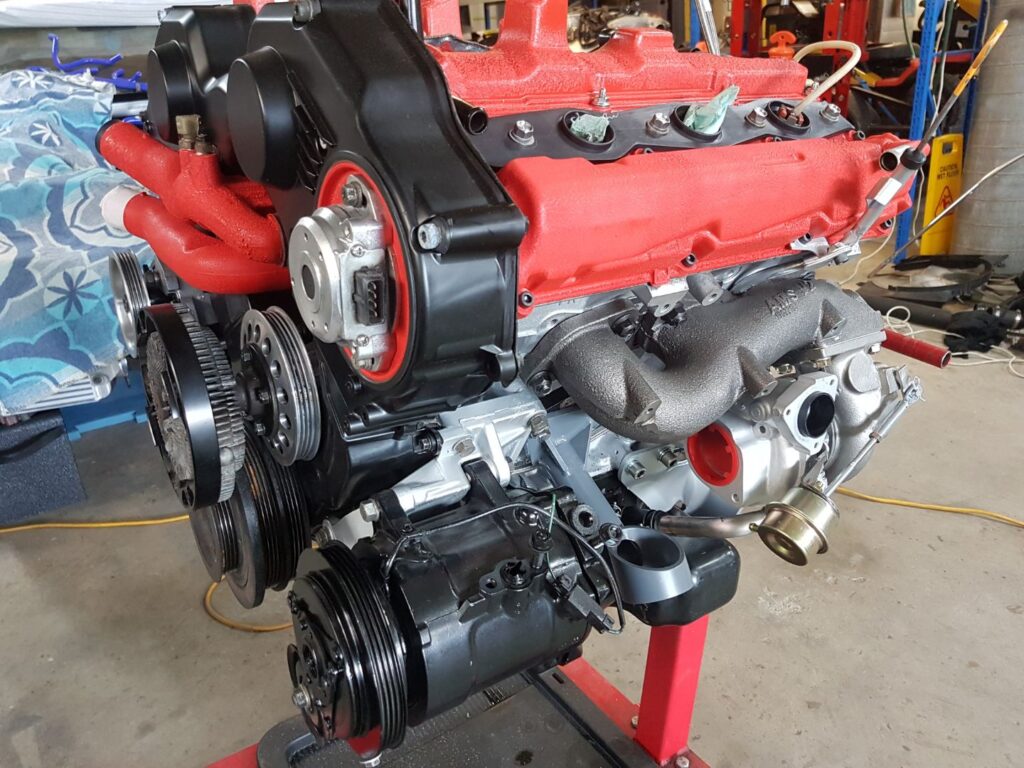
Engineshop did a fantastic job to remachine the crank true, swapped to larger bearing grades to compensate for rectifications, thrown a set of ARP Conrod & Main Studs kit for an extra insurance policy, had the cylinder heads fully serviced with OEM hardwares and we were back in business with a 0km refurbished VG30DETT!
In the time between the machine shop doing their thing & solving the issues, my client had been busy buying new motor things. BDE Oil filter relocation kit & Low Profile Engine Mounts, AMS High-flow Exhaust Manifolds, the turbos were always getting uprated, a set of Hypergear Hi-flow Stage 2s were chosen for ease of direct fitment, genuine replacement coolant hard pipes that were corroded, few other performance and hot up items.
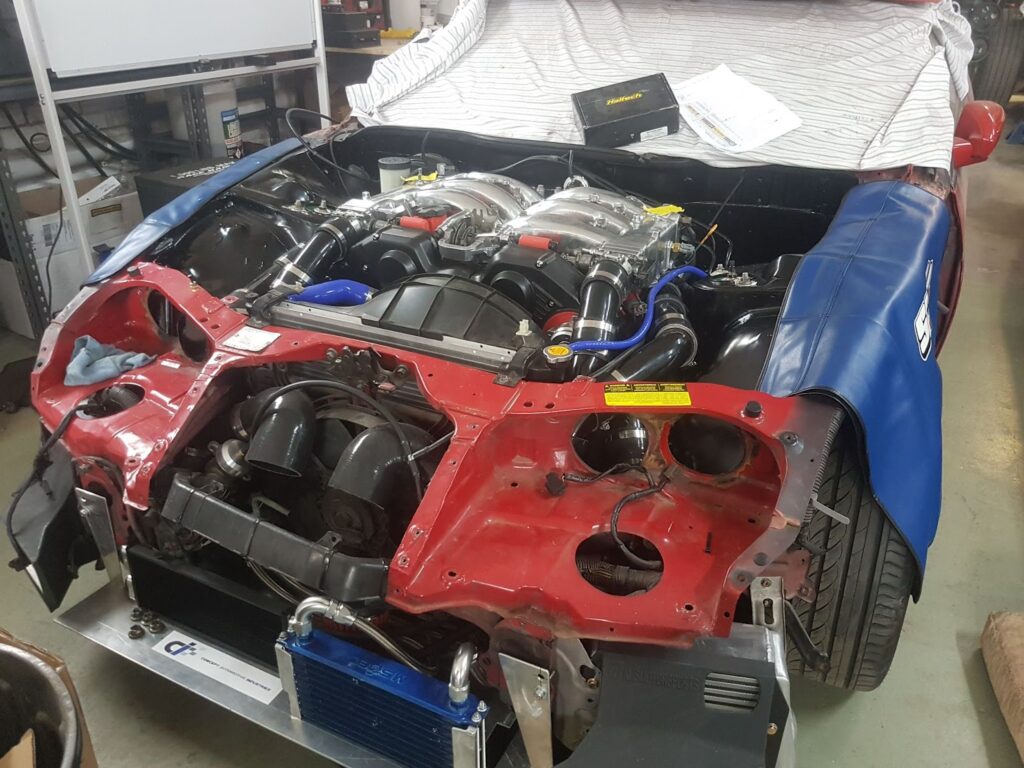
Z32s being the top of Nissan Sport Luxury Lineup of their time, colour matched engine bays were a standard premium feature, unfortunately the paint wasn’t particularly strong or sealed, 30 years on and the passenger side battery trays are always rusted from holding water & battery fumes and the drivers sides Chassis frame & Rail always cop the usual failing Brake Master leaking brake fluid.
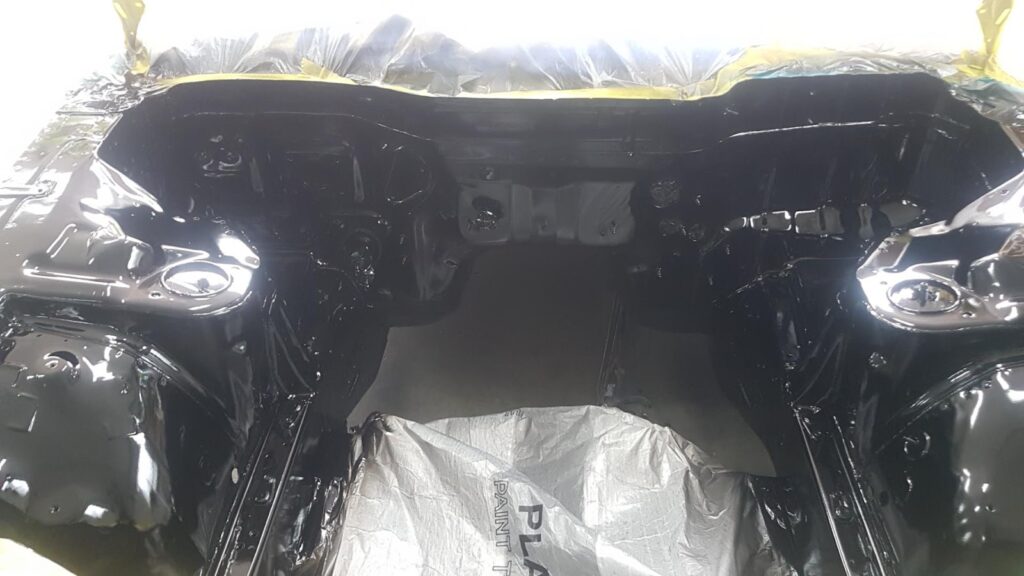
A strong recommendation and service from Concept Automotive Industries is our engine bay restoration package. Anytime a VG30 motor is out, it’s always a good time to tend to the rusted sections. The battery trays usually vary from bad to full cut out and replace levels of decay. I have noticed recently that the level of damage underneath the battery tray is borderline a structural issue so it is always worth unbolting the upright battery tray support and getting eyes on underneath to assess the situation. The client chose a satin black for his engine bay resto to help frame the colour palette of the motor – Silver, Red, Black & Blue & also went for the Battery relocation since the battery tray was beyond salvageable. This leads into performing an engine bay wiring tuck & tidy since it has been removed for the paint works.
Thankfully the Nissan front wiring clip has an almost perfect length to redirect it out of the engine bay without major modifications or cutting any wires.
Bit of engine component paint & polish and the project kept coming together in positive motions.
In the beginning, fuel delivery was going to be big side feeds & oversized rails, somewhere in the thick of the build the client came across an USA company – Merlin Machining, who were doing some trick stuff to get newer style & tech top-feed injectors into Z32s. The Merlin Kit was a great option at the time to get a top-feed setup with larger fuel rails & also included the lower intake core machined by Merlin. Little bit of a backstep in terms of build progress pulling both intake manifolds back off but worth the hassle.
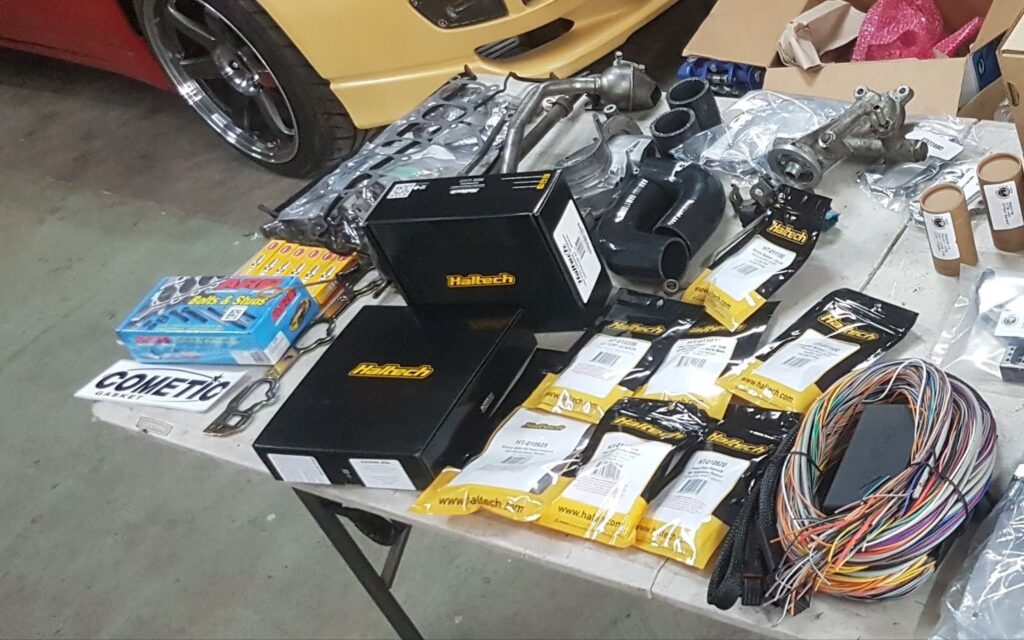
Around this time the discussions regarding which engine management was close to a verdict. It was always going to be a Haltech but either the Platinum Direct Plug In or an Elite 2500. Both are great options, both support Flex Fuel inputs, each was going to include a new engine loom (whether bespoke loom or OEM Replica), ultimately an Elite 2500 was the correct choice. The more advanced tuning capabilities, more aftermarket upgrades being swapped in, the extra sensors required for the build and having greater scope for future advancements and features. Elite 2500 supports Dual Knock Sensors and there is a theory amongst Z32-ists that the blank position in the valley of the block forward of the OEM Knock Sensor was intended for an additional sensor that never made production and whenever i build a VG with an Haltech Elite, i drill, tap & add the secondary Knock Sensor to the motor.
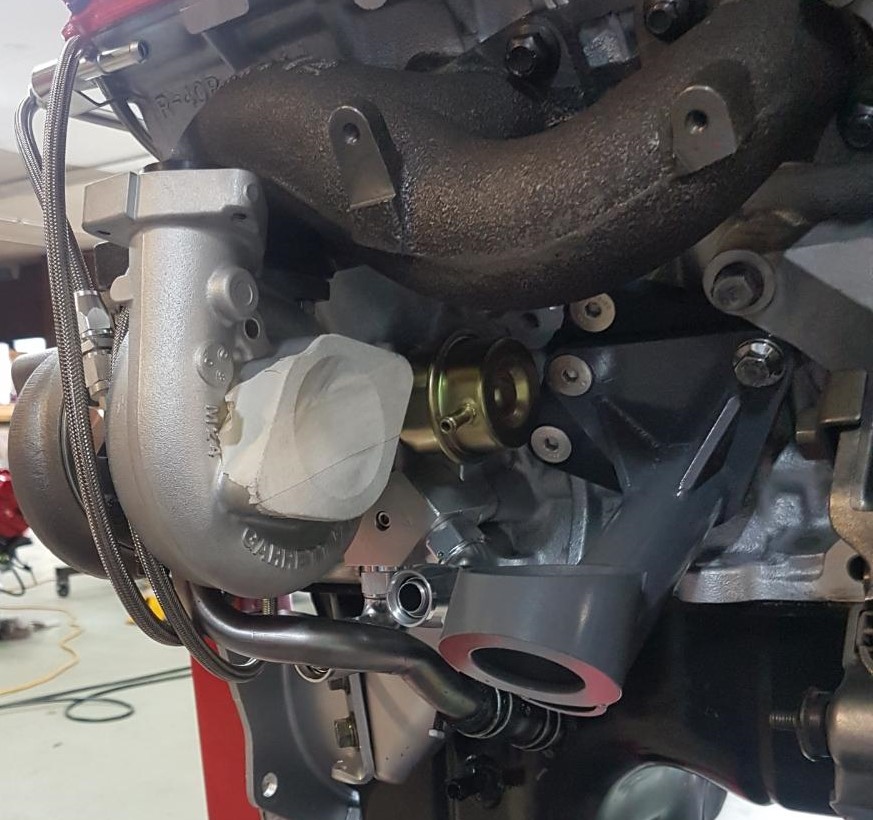
And once more we start moving forward. Top of the motors back together & time to focus on the exhaust side. Hypergear Stage 2s Highflows fit neatly onto the AMS Exhaust Manifolds, the manifolds slightly offset the turbo position to accommodate larger turbos, not relevant in this case but the 30 year old OEM oil & coolant piping is no longer in direct fit application. New braided line replacements are made to fit the new turbo positions and ensure an issue free existence in the future (or as close to issue free as possible).
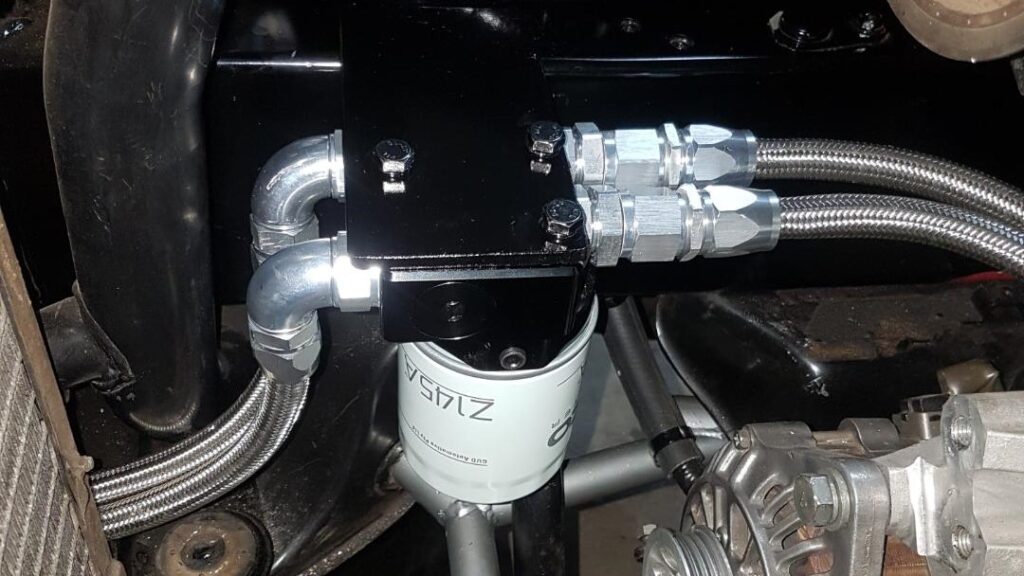
Switching to engine ancillaries, the BDE Oil-filter Relocation Kit mates without any issues (BDE gear is always a flawless fit & finish). Here I have to begin thinking about engine to chassis connections and start planning routing & plumbing for the new positions and additions of fuel, oil and electrical connections, the BDE Low Profile Engine Mounts offer heaps of room for braided lines to pass through the area. The AEROFLOW Remote Oil Filter Assembly w/ Cooler Outlet moves the oil filter off the motor & allows for a larger AN fittings cooler to be installed in place of the OEM oil cooler.
Next pivoting point…deleting the crank driven power-steering system for an TS Astra Electric Pump Unit, The rear system of the HICAS was always being removed so i had sourced an NA system to keep it neater in the engine bay but again we pick reverse gear and remove the pump & lines in place of the electric pump system. This required another reposition of several hardwares in the engine-bay but ended up offering a better position for the remote oil filter housing.
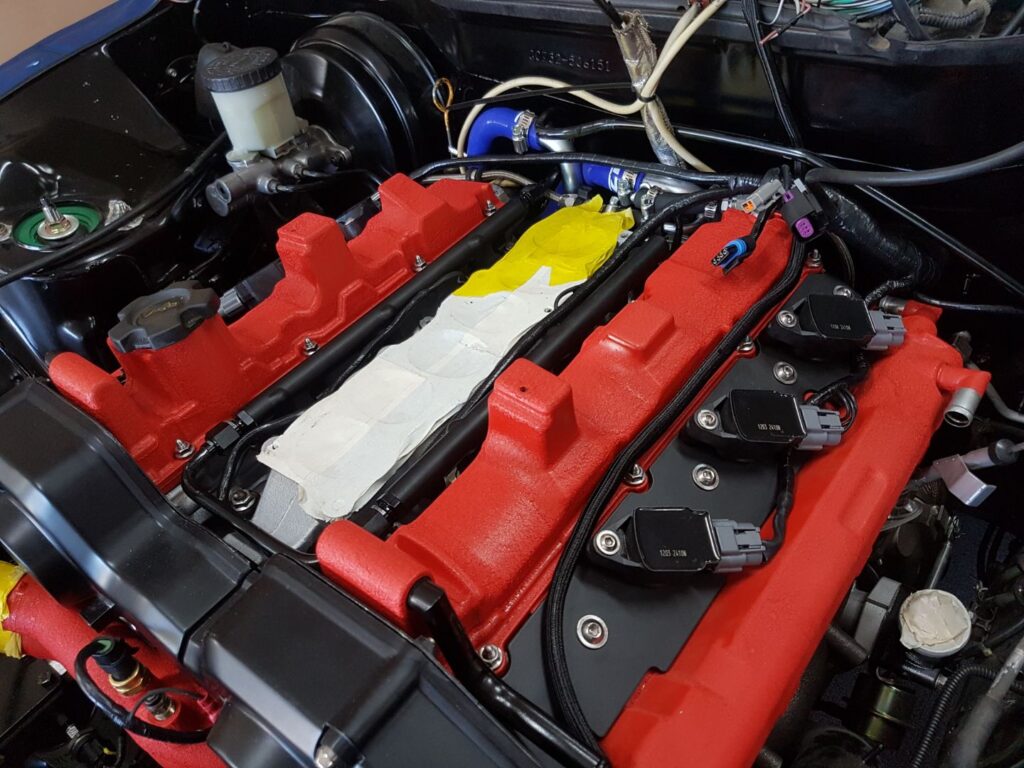
A Polar Engineering GTR Coil kit was also added onto the build and so for what I swore would be the final time, I removed the upper manifold. The Client had a look in mind & wanted the upper manifold and throttle bodies polished so whilst waiting for that process i had the time to alter the engine loom wiring. Along with a suite of Haltech sensors, a Haltech idle motor was picked to replace the semi complex Nissan idle setup, the Manifold Balance tube was simplified, this gave up some extra real-estate for the Turbosmart Fuel Pressure Reg & Haltech Flex Fuel to be mounted on the backside of the manifold – keeping the engine-bay compact & clean.
Onto the supporting chassis componentry, US suppliers were having a sale on AMS gear so the client loved the idea of larger side mount intercooler & ducts – which was a good choice. The 2.5” Intercooler Hard-pipe Kit was a tight bit of kit to fit with everything installed into engine-bay at this stage. But I did some undoing and made it fit with some extreme massaging, giving this build the best chance to achieve its maximum potential.
On the exhaust side, the client supplied a set of 2.5” split intermediate dumps to suit the highflow 4 bolt turbos, decent units for what they were – only criticism is changing the starter motor is a driver’s side exhaust off situation now.
A lot of forwards and backwards, few serpentines and the powerplant was looking good. This was the first time when this vehicle began to look like a semi completed car again. The chassis was setup for success and brakes & suspension is a large contributor to that. During all of this the client had been curating a hefty suspension catalogues worth of parts – adjustable arms, poly bushes etc. There were a few double ups in there & a few incompatible versions of items from different brands but we worked to put together a nice street package.
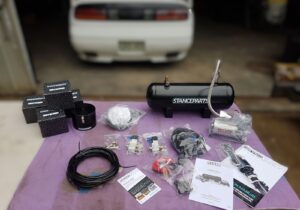
As fate would have it an original ESS Racing S.A.W (Shift At Will) Kit came across the clients desk somewhere in the middle of all this. It promised to give the manual control when the client wanted to blow the doors off whilst keeping the cruiseability of the automatic transmission. I wasn’t keen to install the S.A.W kit before tune, just keeping everything “simple” as we moved closer to tune time. The last remaining tasks were getting picked off & piece by piece the puzzle was coming together real nice.
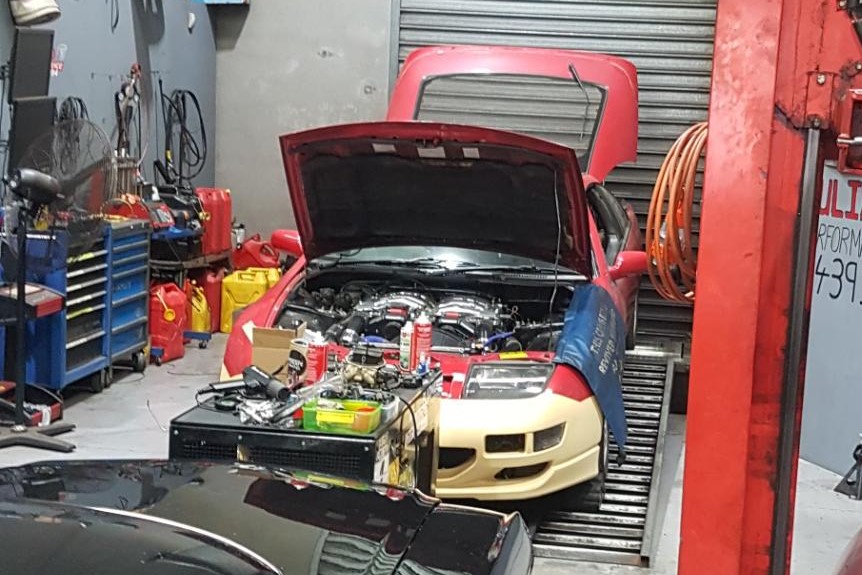
I always do sensor calibrations & basetunes to do the run in kms on my builds, trying to keep the shenanigans to a minimum for myself and the tuner’s sanity. Preflight checks were complete so chuck a bumper on it, quick oil change and off to the tuners!
Tune day dawns and everything goes as expected, tuner was adding boost, motor was making power. Nothing out of the ordinary. Being Ended up pushing a 210ish Kw @ 13/14 PSIs = about right…now it’s E85 time!
Couple adjustments & 1st run up and there’s that ethanol magic – near 240 kW – brillant.
2nd run and seems fuel delivery dropping off at the top end of the RPMs.
The 3rd run never made it past 5k RPM and this is where the Haltech Elite 2500 shines, safety protocols kicked in for fuel issues a plenty, so another “all stop” and assess the situation..
Now the Walbro 460 fuel pump &the Raceworks 1100cc should be capable of handling fuel load & supply at this level. The factory chassis fuel lines are good enough size for this sort of build so unlikely the fuel pressure drop is due to infrastructure.
Move my attention to the Aeroflow Fuel Filter, crack that open and find 35 years of sediment that I can only presume was adhered inside the hardlines had liquefied and blocked the filter trap so full points to the filter goalie!
Clean filter, check in the tank to make sure something wasn’t stored inside or that the pump hadnt sucked up anything and restarted and everything’s 100/100.
Tuners kept running more in and engine kept punching more out, we finished at a pleasant 270rwkw @ 17PSI when the auto was showing signs of slipping.
I always insist on putting some KMs on vehicles post tune just for peace of mind and to also learn the vehicle, so when i’m demonstrating the power for the client at handover, only one of us is surprised by it!
Between leaving the tuners & handover (the 1st one but ill circle back to that), the S.A.W Kit went in with bells work paddle shifter boss kit to suit the period correct Momo steering wheel, 3D printed cup holder, Drivers taillight developed a crack so had to change all the in the interest of making the vehicle Roadworthy & Registered. In all this running around I had noticed the auto wasn’t always happy with 17PSI, even with the uprated cooler tucked up in the front bumper.
Relaying this information to the client, he agreed that the best course of action was to take it easy for the transmission’s sake & start saving for a rebuild or manual conversion down the roads away.
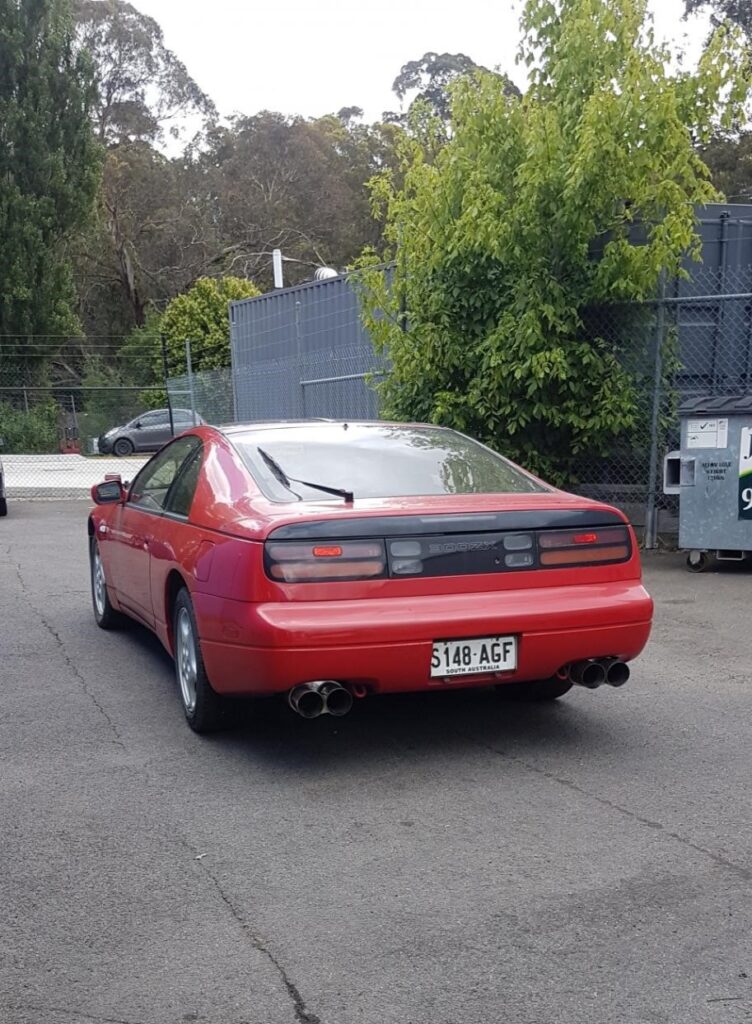
Now all Z32s are not “just a car”, they have soul, they have character and this chassis was not different…a true FairladyZ!
The day of handover – I had managed to put 264 kms worth of varied driving post tune. The client has been in & out over the build years and was a very involved owner so we didn’t have much to discuss, we just needed to have the experience. We started doing some driving. 3rd Gear started playing grumpy but it was still there, by 267km 3rd gear had left the conversation…the client looked at me, I looked at him, we had a telepathic conversation with our eyebrows & then something in the rear view mirror caught my eye…the slightest whiff of smoke & then the unmistakable scent of burnt Dex3. I pulled the vehicle over and again, the client & I had another telepathic conversation where we both concluded it was game over for the auto – so why not give it a Viking funeral and send it off on fire (metaphorically).
I gave the client the controls and we took every last bit of magic the auto had to give and managed to slip it back to base. The reverse park uphill into the driveway was possibly the last bit of life the transmission had to give but it did good. So 270 rwkW tactically took out the transmission 270 km (274 km to be precise)…fate some might say.
The best option moving forward was a manual conversion, it removes the comfort of automatic gear changes & the high expense of building an auto trans system capable of handling the 270kw but does offer a higher HP capable driveline to really hit that 300kw so i began putting together the relative conversion parts and went to work.
This wasnt of my list of things to do that month but I pushed hard to bring it all together.
There was a silver lining to this failure though, when installing the clutch pedal assembly I came across a small amount of coolant inside the heater box. I had replaced the heater core early in the build but that was years previous so an impossible chance it was leftover from that service. I found the leak and I can say in my decades of experience, I have never seen the heater tap spindle leak from the pivoting rod. It was miniscule but I cannot in good conscience leave a failure once found, especially since this whole saga began with a coolant issue – the circle was now complete!
With the coolant leak plugged & manual conversion completed it was back to the tuners for touch ups, the Haltech settings were all over the place trying to adapt itself with the auto trans. The 1st run up was a 240 kW on E85 which was a painful loss from 270kms ago. Virtually a ground up retune with the manual, managed a close 270 kW on P98 but with reasonably used condition TT manual gearbox, Uni-clutch Twin Plate clutch kit holding the VGs super-torque, we pushed a 350 kW @17PSI on E85 on what is ultimately a refreshed 0km OEM internal equipment motor with neat upgrades, new tech & a few tricks…a tully wicked result!
Originally the client wanted 300 kW at the rears, I was truly bummed when it peaked at 270 as an auto, but turned that into fist pumping when it hit a 350!
This was a 4 years expanse with nearly 2 years total in pauses – life happened both for the client & myself as it does, with a few redesigns, couple side steps, reverse gears, cuss words (so many cuss words!), couple cries, several thrown spanners out the workshop doors but the pain, will & determination achieving a stellar result proving the solidarity of VG30DETT Motors & Z32 Chassis.
The design and engineering that went into this motor & chassis was groundbreaking for the Japanese automotive market back in the 1980s for a 1990s production vehicle & they still have the timeless looks 35 years on!
I hope this story shines light on how much goes into such a size & shape build of a FairladyZ Z32 300ZX chassis as a vehicle to build.
I appreciate your time reading this saga.
Regards Brent @ConceptAutoInd
Build List Parts & Services: (all available through Concept Automotive Industries)
– Rebuilt/Refurbished Engine = OEM Internals, Pistons plated up 3 thou w/ all Rings, Bearings, Seals replaced & Major Timing Belt Kit, ARP Head & Main Stud Kit & Rod Bolts
– AMS V2 Highflow Exhaust Manifolds
– Hypergear Stage 2 Highflow Turbos w/ Wastegates
– 2.5” 4 Bolt Split Turbo Dump Intermediates
– (Pair) Highflow Catalytic Converter, 2.5” Magnaflow Resonator & Mufflers
– Merlin Machining Top-feed Lower Intake Manifold w/ Raceworks 1100cc Injectors
– Polished Upper Intake Manifold & Throttle Bodies
– Turbosmart FPR6
– Aeroflow Inline Fuel Filter (small)
– Walbro 460 Fuel Pump
– Polar Engineering GTR Coil Kit
– Twin Air Filter Intake Kit
– AMS 2.5” Intake & Intercooler Piping Kit
– AMS 2.5” Side Mount Intercooler
– BDE Goose Honk Killer Kit for OEM BOVs
– BDE Low Profile Engine Mount Kit
– BDE Transmission Mount
– BDE Lightweight Alternator Mount
– BDE Oil Filter Relocation Assembly
– Aeroflow Remote Oil Filter Housing w/ Alloy Engine Oil Cooler
– TS Astra Electric Power Steering Pump w/ Custom Lines
– Haltech Elite 2500 ECU w/ Bespoke Loom & Sensor Suite, 2CH Wideband Controller, Knock Sensor x2. 4000 PSI Temp & Pressure Sensor, 145 PSI Temp & Pressure Sensor, 3 Port Boost Solenoid, Flex Fuel Sensor, ,Idle Motor Assembly
– Giuliano Performance Tunes x2
– Various Braided lines, Hardline, AN fittings
– Uni-clutch Kit w/ Adapter Kit
– NA Clutch Master, Slave & GKTech Braided Clutch Line
– Tein Coilovers
– Z1 Silicone Radiator Hoses
– GKTech Z32 FUCA
– Driftworx Adj Rear Control Arms Set
– Nolathane Bushes (throughout)
– HFM BM57 Brake Master
– Optima D34 Battery w/ Aeroflow Mount (Boot Mounted)
– Heater Core
– 3D Printed Ashtray replacement Cup holder w/ Acc Socket, USB & Volt Gauge
– Used Condition Manual Gearbox, Tailshaft, Shifter & Clutch Pedal Assemblies
Brent here of Concept Auto Ind Doing a walk/talk through of a CPS Digital Hall effect sensor upgrade with a bearing & oil seal replacement
Being an interference motor, Nissan didn’t leave much room for failure, and the Timing Belt is the grenade pin, if any timing components fails &
Having a discussion with a fellow Z32 owner & long standing friend regarding a suitable suspension solution for his performance focused Z32 build. Straight up
Every now and then you get a vehicle in with a recuring issue, usually predated with several attempts at resolution. This Z32 was receiving our